Using Transition Curves
While designing my new N scale dog-bone layout,
I encountered the need to
use transition curves. The minimum radius on this layout is 280 mm(11") which
is on the lower side. This makes the use of transition curves more important.
Apart from simple transition curves designed to ease the transition from a
straight to a curve, this layout had a more complicated transition. This led
me to attempt to analyze different situations where one would use transition
curves. Let us look at a few situations involving of transition curves.
A transition curve can be seen as a curve where the radius
at a point on the curve
changes gradually as you move along the curve. Let us adopt a convention of
using a radius of  for a
straight line, r for a curve and
-r when the
centre for the radius is on the other side of the curve. Some situations
where one or more transition curves are needed are described below. I have not
done any simulations or actual operation using the suggested curves.
for a
straight line, r for a curve and
-r when the
centre for the radius is on the other side of the curve. Some situations
where one or more transition curves are needed are described below. I have not
done any simulations or actual operation using the suggested curves.
Straight to Curve
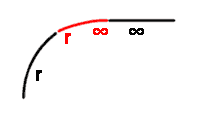
This is the most common example where a transition curve is used. The
straight is a tangent to the curve. A transition curve with the radius
from the straight going from
to r
where r is the radius of the curve is
used.
Curve to Curve
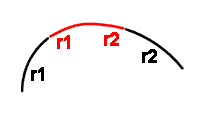
This assumes that both curves have their centres on the same side. A
transition curve with the radius going from r1 to
r2 where r1 and
r2 are the radii of the two curves is
used.
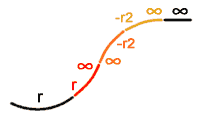
Curve to Reverse Curve
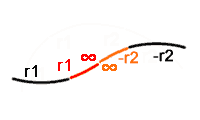
This is the S curve commonly encountered on many layouts. Two transition
curves are needed. The first starts from the curve with a radius of
r1 transitioning from a radius of
r1 to .
This is followed by a second transition curve going from
to
-r2. r1 and
r2 are the radii of the two
curves.
Straight to Straight
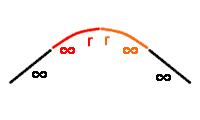
The two straights are at an angle. Two transition curves are needed. The
first goes from to a radius r
and the second is a mirror image with the transition going from
r to . The radius
r is an arbitrary radius. It should be greater than
or equal to the minimum radius for the layout. A small value for
r will result a short, sharp curve between the
straights.
Offset Straight to Curve
This is the most complicated situation I came across. Unfortunately, this
was the situation I encountered in my simple dog-bone layout. The situation
is that of a straight that enters a curve at an angle rather than at a
tangent to the curve. This requires three consecutive transition curves.
The first goes from r to
where r is the radius of the curve. This will result
in a transition that ends in a straight line except that it is at an angle
to the offset straight. This is the same as the situation described in the
previous example - that of two straights at an angle. We have seen that
this can be solved by having two transition curves. This gives us the
solution involving three transition curves.
The last situation is what I encountered in my dog-bone layout. I designed
the profile using an Excel spreadsheet. I eye-balled the resulting curve using
the graph facility in Excel. Once satisfied, I converted the coordinates in the
Excel spreadsheet to a series of macro instructions for my CAD package. Running
the macro drew the resulting transition curves straight into the drawing of my layout.
Unfortunately, it extended beyond the edge of the lobes of plywood which I had
already cut in advance. Several iterations along with the reducing of the
minimum radius to 250 mm(10") gave me a curve that fitted within the plywood
base. The lower minimum radius will hopefully be tolerable with the use of
transition curves. The resulting curve was then printed in full scale
on several pages which were mosaiced together using sticky tape. This was then
transferred on to the plywood base and the line was used to guide the laying
of the track. The line for the edge of the ballast strip was drawn rather than
the centre of the track. This simplified laying the track and the ballast. The
ballast strip is fairly uniform in width.
A transition curve is a curve where the curvature(reciprocal of the radius)
changes linearly as you move along the curve. This curve is called a
clothoid. A simplified version of this curve is the cubic spiral where the
curvature changes linearly as you move along the X axis. this works well and
is a reasonable approximation for short curves. All transitions used on my
layout are cubic spirals. Due to the additional complexity of going through
several iterations of arranging the transition curves, the approach of using a
spreadsheet to calculate the extent of the curves was used. In more mundane
use of transition curves, I use my Cubic Spiral
Template.


Updated on 5 Dec 2000. Feedback to
