I had seen references to the need for transition curves in John Armstrong's book. An issue of Model Railroader also mentioned it and gave an equation for it. There are a few excellent references on the Web as well which are listed at the end. One of them mentioned that the main reason was to provide super-elevation runout. As sideways lurch is a bigger problem with model railroads, I thought of using a curve to reduce the lurch rather than model the prototype.
My mathematics not being very strong, I set up a Microsoft Excel spreadsheet to simulate the magnitude of lurch for a given curve. Then I tried a curve where the radius at a point increased linearly. At this point, I could see that a 300mm(12") to 400mm(15") transition is a lot sharper than a 400mm(15") to 500mm(18") transition, although the change in radius is the same. A linear increase in radius along the curve was clearly not appropriate. What was probably required was a curve where the radius increased slowly to start with and then very quickly. The reciprocal of the radius(curvature) seemed to have the right behaviour. So what I needed was a curve where the curvature decreased linearly. I plugged these values into the spreadsheet and it seemed to work very well. And as more experienced readers who would be snickering at this point may have realised - I found out that this described a cubic spiral!
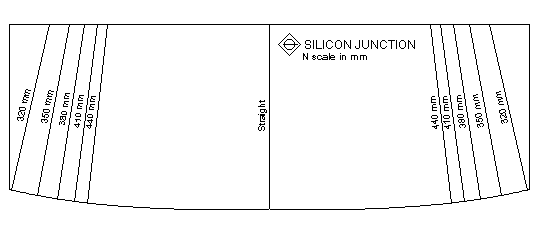
To help lay out the curve on the layout, I made a template. The spreadsheet came in handy to find points to define the curve. I thought the various values for the length of the curve for a radius were not necessary - instead opting for a single spiral. I found out that the term radius was not correct and curvature was the right term, thanks to sci.math. However, radius makes more sense to model railroaders so I will continue to use it. The radius of the spiral is infinite at the middle and slowly decreases as you travel upwards on each side. A few convenient radii are marked along the edge of the template. Lines from these points are drawn along the radius of the circle with same curvature as these points. The right half of the template is used for left-handed straight to curve transitions and the other half is used for right-handed transitions.

The template provides an easement curve with a minimum radius of 320 mm within a length of about 140 mm. A Postscript file of the template is available. You may need to use a photocopier to reduce or enlarge the printout if it is not exactly to size. A calibration square is provided in one corner to check the size. This square should be 30 mm long on both sides.
Let us assume you are looking at drawing a transition from a straight to a 350 mm radius curve. Draw a perpendicular to the straight at the position where the easement cure should start. Place the template so that the point for a straight on the curved edge is at the place where the curve should start. Align the line for the straight with the perpendicular. Draw the curve from the straight to the 350 mm point on the template. Mark this point and the point on the opposite side of the template for the 350 mm line. These two points indicate the radius of the 350 mm curve. Join the two points and extend this line till it is 350 mm from the easement curve end. This point is the centre. Draw the 350 mm radius curve using this point as the centre.
Drawing a curve to curve transition is the same. Use the radius lines on the same side of the template if the curves are in the same direction. For curves in the opposite direction, go past to the centre of the template. Mark the perpendicular. Use the opposite side of the template and align the straight on the template with the perpendicular. Draw the curve to the required radius and proceed as usual. The restrictions for laying out an S curve should be kept in mind. If necessary, the two parts of the easement curve can be separated by a straight.
I haven't yet made templates for N scale in inches or HO scale in inches or mm. If you need any of these or a cubic spiral of a different length let me know. The program was written in Excel Basic to get some of its values from a spreadsheet. This program generated a script file suitable for TurboCAD. If the program is seen as being of value I could have a crack at writing it in a more suitable form.
A discussion on transition curves, some equations for it and more equations for it are available on the web. Easement templates for HO and N are also available.


