I started modelling in HO and then moved to N scale. I don't let subtleties of prototype get in the way - I don't cringe when I see my German steam engine dragging a row of container cars behind it but I draw the line at Thomas the tank engine.
I did not want to throw my HO stuff away so I built a small point to point track along the wall of my garage a little higher than a metre from the floor. As my N scale layout is not yet operational, the HO layout is used as a test bed. Besides, it gives me an excuse to continue buying HO trains.
The N scale layout is 1800mm x 1200mm. It has a frame built with steel angle. It is strong enough to take my weight and I am no feather! It is not very rigid - it has a tendency to twist. This may be due to the complete lack of diagonal braces.
To check the layout design, I built a dummy layout with strips of paper set vertically on the steel frame using Blu-tac. The top edge of the strips were cut to mimic the grades on the layout. This allowed me to check if the layout will work in practice and vertical clearances were sufficient.
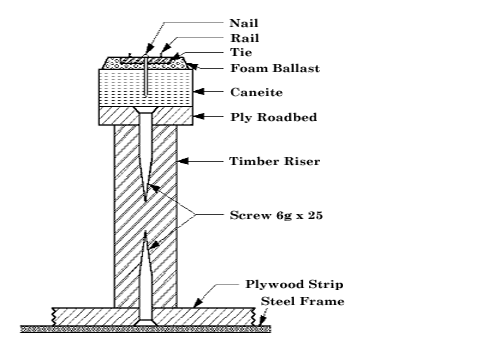
The roadbed is cookie-cut out of plywood. Most layouts use ply 12mm or thicker. I used thinner ply - it is about 6mm. This should allow me to bend it to form varying vertical gradients. I did not think 12mm ply can be bent to for 0 to 4% grades. The roadbed is elevated above the steel frame by vertical timber risers. The risers are cut out of 20mm square rods. They are screwed on to the ply roadbed on one side and to a plywood strip on the other with 6g x 25mm countersunk screws. The plywood strip is then bolted to the frame. As the tracks are close to each other, more than one roadbed is screwed on to each plywood strip. In the distant future, when I get around to adding scenery, platforms may be added in the same way.
The roadbed will have a layer of 12mm Caneite on top. Caneite is a cardboard-like material which may be similar to Homasote. The Caneite will be topped by foam ballast by Peco followed by Peco flex track. The Caneite will be glued to the ply but the foam ballast is not glued on. This allows me to change my mind as I build the layout without ruining the track or the foam ballast. The ballast looks awful but I bought several metres sight unseen by mail order so I intend using it. I drill a hole in the sleeper and put a Peco nail through it. This nail is thin which makes it suitable for N scale. It is also very long(14mm) but the sleeper, foam ballast and Caneite should keep it from hitting the ply. To drill holes in plastic ties, I use a small drill chuck that fits into my power screw driver. The turnouts and turnout motors are Peco.
Being the roll-your-own type, I attempted writing software to design my layout. I started off writing it and figuring out some of the problems but it was too difficult a task and found the easy availability of layout software very discouraging. So this one's shelved for a while. Meanwhile, I am doing a drawing of it in a CAD package and intend to refine it while I am laying it out on ply.
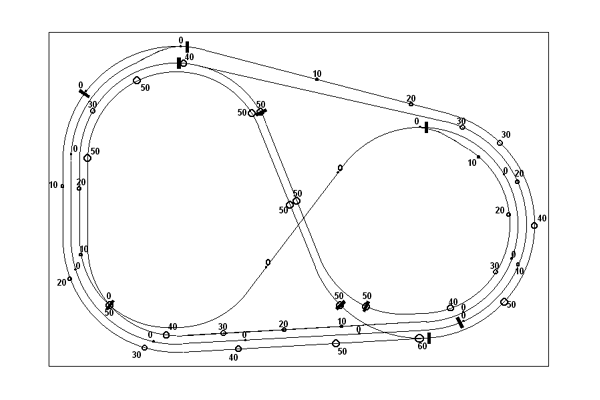
My primary aim was to have enough track in a very small place and two loops which could keep two trains going around in circles without intervention. The figure below shows the rough shape of the layout. The dark circles on the layout diagram indicate the elevation in mm. The size of the circle is proportional to the elevation. Actually, the entire layout is elevated by 40 mm over the frame to allow for 'below sea level' scenery. The thick bars indicate where the changes in gradient occur. It is obvious that it is far from prototypical and falls prey to the bowl of spaghetti look - I am thinking of calling it The Tagliatelle Loop.
Some of the layout details are given below.
| In mm | In inches | |
| Size | 1200x1800 | 48x72 |
| Minimum Radius | 320 | 12 1/2 |
| Dist. between parallel tracks (centre to centre) |
30 | 1 1/4 |
| Maximum Gradient | 4% | 4% |
| Vertical Separation | 50 | 2 |
| Minimum height over frame | 40 | 1 1/2 |
| Maximum height over frame | 100 | 4 |
To squeeze in as much as possible into a small space, some of the standards have sometimes been set lower than those recommended in John Armstrong's 'Track Planning for Realistic Operation'. Most curve to curve and curve to straight line transitions were to be made using a cubic spiral. To do this I intend to use a cubic spiral template.


